Un petit exercice de contrôle d'IFC avec la bibliothèque ifcopenshell
if this article is not in your language, use the Google Translate widget
(bottom of page for Mobile version) ⬈
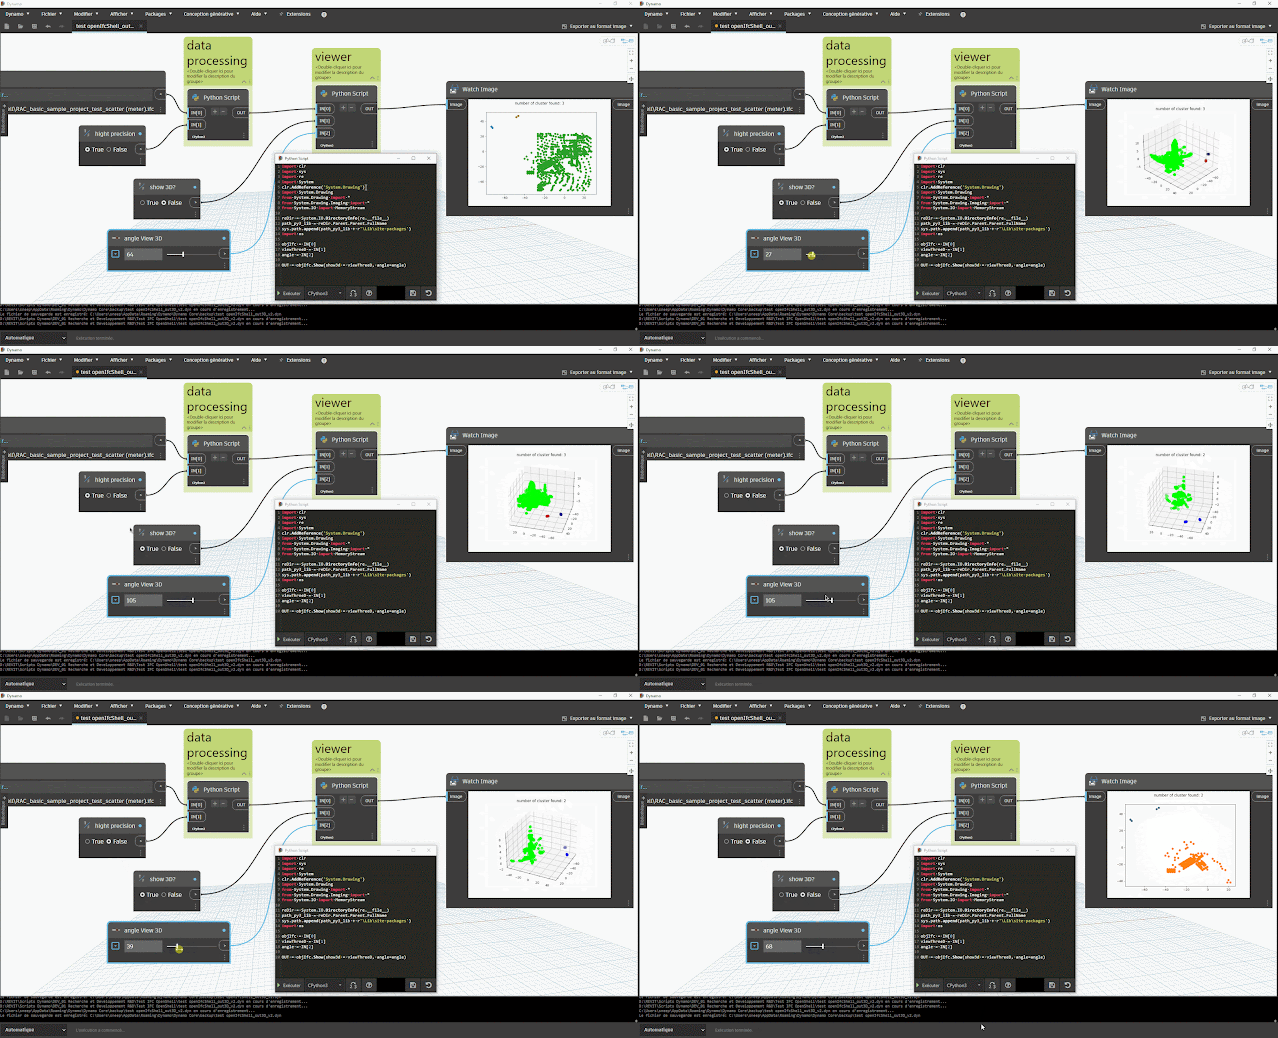
Sur le projet RAC_basic_sample_project, a été rajouté volontairement quelques éléments éparpillés (1 mur et quelques poteaux)
Le but est de contrôler un éventuel éparpillement d'éléments sur un IFC (un peu comme le fait Solibri) avec les bibliothèques Python sklearn et ifcopenshell
Pour ce faire, j'utilise ici l'algorithme DBSCAN, un des avantages est de pouvoir définir un nombre minimum de clusters recherche (ici égal à 1)
aperçu des résultats dans Dynamo :
- du nombre de clusters (éventuel problème s'il y a plus d'1 cluster)
- du tracé du graphique à nuage de point avec la bibliothèque Matplotlib
Bibliothèques Python3 nécessaires :
- sklearn
- ifcopenshell
- pillow
- matplotlib
- numpy
À la différence des autres librairies Python qui peuvent s'installer avec
pip (lien forum /
lien Github), ifcopenshell doit être installé manuellement, car le package
n'est actuellement pas disponible sur pypi
1. télécharger le package à cette adresse http://ifcopenshell.org/python suivant la version du moteur Python.
C:\Users\<USERNAME>\AppData\Local\python-<VERSION>-embed-amd64\Lib\site-packages
Attention à la version Python
Le script possède 2 modes :
- un mode standard basé sur la localisation des éléments
- un mode plus précis (processus plus long) base sur la localisation des sommets des géométries (shape) des éléments
Le code Python (moteur CPython3/PythonNet)
import clr
import sys
import re
import System
clr.AddReference('System.Drawing')
import System.Drawing
from System.Drawing import *
from System.Drawing.Imaging import *
from System.IO import MemoryStream

reDir = System.IO.DirectoryInfo(re.__file__)
path_py3_lib = reDir.Parent.Parent.FullName
sys.path.append(path_py3_lib + r'\Lib\site-packages')
import os
import traceback
import ifcopenshell
import ifcopenshell.geom
from ifcopenshell.util.placement import get_local_placement
import numpy as np
from sklearn.cluster import DBSCAN
import matplotlib.pyplot as plt
from mpl_toolkits.mplot3d import Axes3D
from PIL import Image
import io
import multiprocessing


class ImgUtils():
    def __init__(self):
        pass

    def plt2arr(self, fig):
        """
        need to draw if figure is not drawn yet
        """
        fig.canvas.draw()
        rgba_buf = fig.canvas.buffer_rgba()
        (w,h) = fig.canvas.get_width_height()
        rgba_arr = np.frombuffer(rgba_buf, dtype=np.uint8).reshape((h,w,4))
        return rgba_arr

    def convertToBitmap2(self, npImgArray):
        """ convert numpy array img to bitmap """
        bitmap_ = None
        # remove alpha
        if npImgArray.ndim == 3 and npImgArray.shape[-1] == 4:
            npImgArray = npImgArray[:, :, :-1]
        # convert to PIL Image
        if npImgArray.ndim == 3:
            image = Image.fromarray(npImgArray, "RGB")
        else:
            image = Image.fromarray(npImgArray, "L")
        # convert to Python ByteArray
        byteIO = io.BytesIO()
        image.save(byteIO, format='BMP')
        byteArr = byteIO.getvalue()
        # convert to Net ByteArray
        netBytes = System.Array[System.Byte](byteArr)
        with MemoryStream(netBytes) as ms:
            bitmap_ = Bitmap(ms)
        return bitmap_


class IfcUtils(ImgUtils):
    def __init__(self, file_path, hight_precision):
        super(IfcUtils, self).__init__()
        self._file_path = file_path
        self.ifc_file = ifcopenshell.open(self._file_path)
        self._hight_precision = hight_precision
        self.array_pt = []
        self.clusters = []
        self.yhat = None
        self.model = None


    def get_2dLocation(self, ifcproduct):
        """ get 2d locatio from ifcproduct with ObjectPlacement property """
        placement_matrix = get_local_placement(ifcproduct.ObjectPlacement)
        x = float(placement_matrix[0][-1])
        y = float(placement_matrix[1][-1])
        z = float(placement_matrix[2][-1])
        return round(x, 1), round(y, 1), round(z, 1)

    def PrintData_IfcClass(self, ifc_class_lst = ['IfcSite', 'IfcBuilding']):
        """ print some Ifc data class """
        for  class_str_ifc in ifc_class_lst:
            products_class = self.ifc_file.by_type(class_str_ifc)
            for product in products_class:
                print("****************************")
                print("Type : ", product.is_a())
                print('GlobalId :', product.GlobalId)
                print('Description :', product.Description)
                print('IsDefinedBy :', product.IsDefinedBy)
                print('Representation :', product.Representation)
                print('Name :', product.Name)
                print('product_Infos :', product.get_info())
                #
                type_product = ifcopenshell.util.element.get_type(product)
                if type_product is not None:
                    print(('type_product :', type_product))
                    print(('type_productName :', type_product.Name))
                    print(('type_product_Infos :', type_product.get_info()))
                #
                commonAttrs = list(product.get_info().values())[2:-1]
                print(('commonAttrs', commonAttrs))

    def SearchClusterPoints(self):
        """ search Cluster by location """
        settings = ifcopenshell.geom.settings()
        settings.set(settings.USE_WORLD_COORDS, True)
        # get unit length
        global_unit_assignments = self.ifc_file.by_type("IfcUnitAssignment")
        # The global context defines 0 or more unit sets, each containing IFC unit definitions (using list comprehension):
        global_length_unit_definition = [u for ua in global_unit_assignments for u in ua.Units if u.is_a() in ('IfcSIUnit', 'IfcConversionBasedUnit') and u.UnitType=='LENGTHUNIT'][-1]
        # set esp value for DBSCAN
        esp_value = 40000.0 if global_length_unit_definition[2] == 'MILLI' else 40.0
        if self._hight_precision:
            esp_value = esp_value * 0.5
        #
        products = self.ifc_file.by_type('IfcProduct')
        out_location = []
        #
        ### Start Processing ####
        if self._hight_precision:
            iterator = ifcopenshell.geom.iterator(settings, self.ifc_file, multiprocessing.cpu_count())
            if iterator.initialize():
                while True:
                    shape = iterator.get()
                    element = self.ifc_file.by_guid(shape.guid)
                    out_location.append(self.get_2dLocation(element))
                    faces = shape.geometry.faces # Indices of vertices per triangle face e.g. [f1v1, f1v2, f1v3, f2v1, f2v2, f2v3, ...]
                    verts = shape.geometry.verts # X Y Z of vertices in flattened list e.g. [v1x, v1y, v1z, v2x, v2y, v2z, ...]
                    materials = shape.geometry.materials # Material names and colour style information that are relevant to this shape
                    material_ids = shape.geometry.material_ids # Indices of material applied per triangle face e.g. [f1m, f2m, ...]
                    # Since the lists are flattened, you may prefer to group them per face like so depending on your geometry kernel
                    grouped_verts = [[verts[i], verts[i + 1], verts[i + 2]] for i in range(0, len(verts), 3)]
                    for x, y, z in grouped_verts:
                        out_location.append([round(x, 1), round(y, 1), round(z, 1)])
                    grouped_faces = [[faces[i], faces[i + 1], faces[i + 2]] for i in range(0, len(faces), 3)]
                    if not iterator.next():
                        break
        else:
            for product in products:
                out_location.append(self.get_2dLocation(product))

        self.array_pt = np.array(out_location)
        # remove the duplicates point
        self.array_pt = np.unique(self.array_pt, axis=0)
        # define the model
        self.model = DBSCAN(eps = esp_value, min_samples = 1)
        # fit model and predict clusters
        self.yhat = self.model.fit_predict(self.array_pt)
        # retrieve unique clusters
        self.clusters = np.unique(self.yhat)

    def Show(self, show3d = False, angle=200):
        fig = plt.figure()
        if not show3d:
            fig.suptitle("number of cluster found: {}".format(len(set(self.model.labels_))))
            for cluster in self.clusters:
                # get row indexes for samples with this cluster
                row_ix = np.where(self.yhat == cluster)
                # create scatter of these samples
                plt.scatter(self.array_pt[row_ix, 0], self.array_pt[row_ix, 1])
        else:
            #ax = Axes3D(fig)
            ax = fig.add_subplot(projection='3d')
            ax.scatter(self.array_pt[:,0], self.array_pt[:,1], self.array_pt[:,2], c = self.model.labels_, s=70, cmap='brg' )
            ax.view_init(azim=angle)
            ax.set_title("number of cluster found: {}".format(len(set(self.model.labels_))))
        image_from_plot = self.plt2arr(fig)
        bitmap1 = self.convertToBitmap2(image_from_plot)
        return bitmap1


file_path = IN[0]
hight_precision = IN[1] # boolean
#
objIfc = IfcUtils(file_path, hight_precision)
objIfc.SearchClusterPoints()

OUT = objIfc
Note :
La variable
esp_value peut être
ajustée si besoin (distance maximale entre 2 points pour la
détection)
- Script Dynamo (pour test)
- Ressources et documentation


0 commentaires:
Enregistrer un commentaire